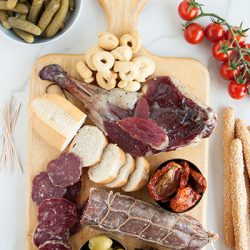
Kosher prosciutto and goose salami
Ingredients
- 1 whole goose
- 2 tbsp black pepper
- 2 tbsp allspice
- 12 tbsp salt
- synthetic casings
Instructions
- Ask your butcher to pluck, clean and empty the goose of all the entrails. If possible, ask to also have the skin of the neck set aside for later usage.1 whole goose
- Bring the goose home and place it on a cutting board, breast side up. Stop for a moment, inspect the goose, and say: “no ghe se più le oche de ‘na olta” (geese are not as good as they used to be). Anna, who taught me the recipe, says that complaining about the goose is of vital importance to the process, and I believe her. In a bowl, mix salt, freshly ground black pepper and allspice.2 tbsp black pepper, 12 tbsp salt, 2 tbsp allspice
- First of all, use a very sharp knife to carve out the legs. Find the soft and fatty spot in each thigh where the leg connects to the body and start cutting around the leg from there; move on to cutting into the tendon, so that the leg can pull away easily.
- At this point, decide if you want your prosciutto on the bone or not; if not, separate the meat from the bone and set the bones aside. In any case, keep the skin attached to the legs: you can make prosciutto using just the meat, but the skin adds to its flavor.
- Next, cut the goose along the breastbone in the middle to separate the breast meat from the body.
- Carve each breast gently, keeping the skin on, and once you are done carving trim away the extra bits of skin and fat, to obtain two neatly shaped breasts. At this point, whatever is left on the carcass is for salami making.
- With the help of a second person, pull the bones from opposite sides to crack the carcass open in two, then carve out all the meat left on it and set it aside in a bowl. The bones can be treasured to flavor broths and soups.
- After all the carving, you should have on the counter: legs, both of which will become prosciutto breasts, which you can allocate either both to prosciutto or one to salami and one to prosciutto some odd bits and pieces of meat and skin, for the salami and the so-called gribole (the same as Ashkenazi gribenes!).
- To make prosciutto, place the meat (the same procedure applies to legs and breasts) in a glass bowl, rub it generously with 1/3 of the mix of spices, and leave it to rest in the fridge. The total resting time for the meat in the fridge is 7 days.
- For the first six days, remove any liquid that might have formed and repeat the rubbing every two days.
- On the sixth day, take out the leg and use a sterile needle and food-safe thread to sew the meat around the bone (or on itself, if you have decided to avoid the bone) to perfect the shape of your prosciutto. The breast doesn’t require any sewing if you have trimmed it well.
- Put the meat back in the fridge, cover it loosely with cling film, and press it down with a weight (e.g. a heavy jar) for 24 hours.
- Pat the meat with a paper towel, tie it with string, and hang it somewhere cool: traditionally, the meat is left to season and dry open air, outside in the winter, or in a wine cellar in the summer. The prosciutto is safe to eat as early as a month into the drying, but it’s best left to season for 3-4 months.
- Now onto the salami (also called in Venetian dialect luganegotto). Collect all the leftover meat and skin on the carcass and chop it with the knife, together with the one breast previously set aside. It’s also acceptable to grind the meat instead of chopping it by hand, should you prefer to proceed that way. To make the salami, you will need either the skin from the neck of the goose or store-bought synthetic casings.synthetic casings
- If you decide to proceed with the skin option, sew it together to form a long and wide rectangle and rub the skin with some of the spice mix used for prosciutto.
- Place all the filling inside the skin and roll it up tightly, sawing as you go, to obtain a salami shape.
- Poke some very small holes in the skin with a needle to let the air escape and make sure to squeeze well your salami to remove as much air as possible. You can make one long salami or create multiple smaller ones by tying the salami with string as many times as you like.
- If you decide to opt for a store-bought synthetic casing, remember to soften it in warm water before usage, then flip it to rub the inside with spices and flip it again to fill it.
- Exactly like the prosciutto, the salami is left to season and dry open air, outside in the winter, or in a wine cellar in the summer. The salami is safe to eat after 2-3 months of seasoning.
Tried this recipe?Let us know how it was!