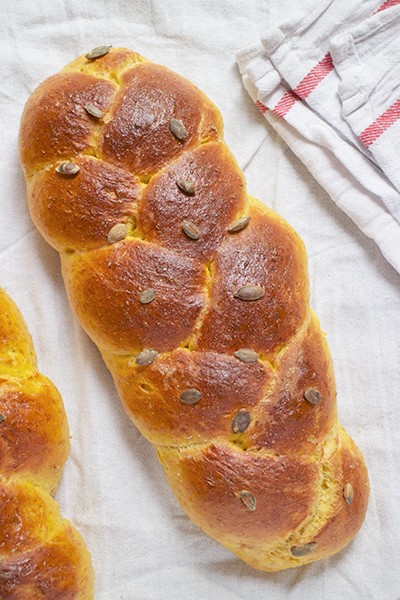
Gluten-Free Challah
Challah, the sweet braided bread we prepare to celebrate Shabbat on Friday night, is one of the dishes Manuel and I are most known for, and by far one of the most clicked recipes on this website. Perhaps it is because we include challah in almost every cooking class we teach, or maybe simply because challah is so good that people just fall head over heels in love with it at the first bite… who can say for sure? Regardless, challah consistently garners resounding success among both our virtual and “in-person” friends… with one exception, the celiacs! Challah is unfortunately not suitable for people who are gluten-free, so a lot of readers have asked us over the years to help them prepare a gluten-free challah. We tried, and tried, and tried some more… and finally, here is our gluten-free challah.

In our opinion this gluten-free challah is truly delicious: of course, the texture is not exactly like that of regular challah with gluten – you can’t expect a miracle exactly imitating the original – but it’s as close as we could get and we are pretty pleased! To give you a sense of what you’ll pull out of the oven, the texture is a cross between durum wheat semolina bread and panettone, and the taste is sweet and addictive, just like challah. Try it, and let me know how it comes out!
Over the years we have shared many challah recipes: classic challah, whole-wheat challah, sourdough challah, pumpkin challah, honey challah, not to mention the treats we have prepared with this basic bread dough, like cinnamon rolls, and pangoccioli (chocolate chips buns). It was high time to get to work and create a variant of our favorite bread that is also suitable for those who, for health reasons, can no longer eat it in its original version, don’t you think?

The gluten-free challah recipe that I share with you today is a mix of different recipes: I have modified an already excellent, and super-tested, gluten-free challah recipe for Rosh Hashanah published on Lisa Stander-Horel’s blog (author, among other things, of the book “Nosh On This: Gluten-Free Baking from a Jewish-American Kitchen“, which I strongly recommend); Lisa, in turn, was referring to Joan Nathan’s essential Jewish cookbook “Jewish Holiday Cookbook“, from which she derived the basic recipe and the method to prepare the challah.
I must warn you that it will not be easy to find all of the ingredients needed to prepare this bread, as it requires some rather unusual flours (rice and tapioca) and a few other bizarre powders (like xanthan gum), but you can do it if you want to! Once the ingredients have been gathered, the process is very easy.
In case you are wondering what xanthan gum is, I’ll explain right away: it is a natural powdered gum thickening agent able to make gluten-free flour sticky just like gluten flour in normal dough mixes. Dissolved in water it immediately becomes viscous and sticky, somewhat like the white of the egg, which has the same “agglutinating” effect, being rich in proteins.
Do not even think about making this bread without xanthan, it will be a complete failure. Particularly if you have Celiac disease, invest in this small purchase. You will need xanthan to prepare many other leavened products, and a package will last for a long time.

On top of shopping for unusual ingredients, I would recommend you also shop for a silicone challah mold, such as the one I used. This gluten-free dough, due to the lack of gluten, can’t really hold a shape well, let alone be braided, so a mold is your best bet for a good-looking result. A regular bread/loaf pan will do, but for a challah shape, you need a challah mold.
Another small clarification, this time on a Jewish topic, before moving on to the recipe. If it doesn’t interest you, you can skip it. Technically challah can be defined as such if it is made of wheat, barley, rye, oats, or spelt flour, for at least 51% of its weight. For those strictly practicing the faith, this rice challah is not suitable to be blessed when doing hafrashat challah and hamotzi. If you have this issue, I suggest that you replace part of the rice flour with oat flour, keeping in mind that this may be contaminated by gluten, so you should carefully check that it is gluten-free before using it.
In general, you can replace the flours indicated with other gluten-free flours, just keep the proportion of flour (rice flour in our case) and starch (tapioca in our case) unchanged.
Gluten-Free Challah
Ingredients
- 100 ml warm water
- 12 g active dry yeast
- 30 g sugar
- 4 tablespoons honey
- 150 g extra-fine brown rice flour sifted
- 100 g extra-fine white rice flour sifted
- 200 g tapioca flour sifted
- 1 teaspoon salt
- 6 grams xanthan gum
- 5 eggs at room temperature
- 60 g peanut or sunflower oil
Instructions
- In a small bowl mix yeast, water, and sugar, and wait a couple of minutes for the yeast to look frothy. Once the yeast is activated, add honey and set aside. This recipe is quite sweet because that is how I like my challah. If you want to reduce the amount of sugar or honey, you can certainly do that.100 ml warm water, 12 g active dry yeast, 30 g sugar, 4 tablespoons honey
- In the bowl of your mixer set up with the hook accessory (or, if you work by hand, in a large bowl with a wooden spoon) mix flour, salt, and xanthan together, then add oil, eggs, and the yeasted water from the previous step.150 g extra-fine brown rice flour, 100 g extra-fine white rice flour, 200 g tapioca flour, 6 grams xanthan gum, 5 eggs at room temperature, 60 g peanut or sunflower oil, 1 teaspoon salt
- Knead the dough slowly. This dough will not, in any way, resemble regular bread dough. What you need to achieve here in terms of consistency is a dense and sticky batter.
- Cover the dough bowl with plastic wrap, and transfer it to a warm and cozy place to allow the dough to rise, for a minimum of one hour, and a maximum of two.
- With the help of a spatula, scoop the dough into a regular bread pan covered with parchment paper or in a well-greased silicone challah mold. It is impossible to braid this shapeless mixture, so you will need to give it some sort of shape with a pan. The silicone one I used is on Amazon, but there are many alternatives. I would recommend not filling the pan over 2/3.
- Let the dough rise for another hour in a warm place, until it reaches the edge of the pan.
- Preheat the oven to 400°F and place inside the oven a tiny oven-safe bowl filled with water, which will create the perfect steamy environment for our challah.
- Bake your gluten-free challah for 30/40 minutes, until it is golden brown. The top part of the bread tends to brown faster than the bottom; if this happens and you feel that the bottom needs more baking, cover the top with foil to protect it, or move the pan to the lower half of the oven.
- When the bread is baked, take it out of the oven, gently remove it from the pan, and let it cool completely on a wire rack.
- Do not try to cut the bread immediately, and do not put it away until it is completely cold, otherwise it will remain too moist inside. You can keep the challah wrapped in foil, whole or sliced, for a couple of days, and warm it for a few minutes in the oven before serving.
2024 update – Since we last posted this recipe, we have found two tremendously helpful products we recommend you get your hands on if you are based in the US and want to make amazing gluten-free challah. If you are feeling lazy you can buy the gluten-free challah blends by Orly, which make a nice challah with zero strange-ingredients-hunting efforts on your end. As an alternative, we have also fallen head over heels in love with Steve’s Gluten-Free Bread Flour, a GF blend made locally here in California which allows us to use our regular challah recipe simply swapping flour 1-1, and braid the dough too, which honestly feels incredible for a gluten-free challah. Both products are outstanding and highly recommended if gluten-free is an actual need in your family.